This example is of Google Forms submitting to Fresh Desk
Google forms is an easy to use form builder that has many uses. One advantage of Google Forms is that is is effectively free, either within ‘consumer’ Google Accounts, or more importantly is business Google Apps for Work / Education / Government accounts.
When automating a business process between cloud solutions, systems communicate via API calls.

In this example, I want to use Google Forms as a front end to FreshDesk support ticket system. FreshDesk is an excellent tool and comes already with Web Forms / Widgets that allow you to input via forms – so why do this?
Also, if you are interested, take a look at my post on integrating Google Sheets to WordPress via the Rest API.
Well the FreshDesk forms don’t have a whole load of fields, and using the API allows some additional fields, that may be important to your business process.
Step one – Create a Google Form with the required fields
I prefer to use the new Google Forms, so this tutorial will focus on that, but if you use the classic forms the process is about the same.
Go to https://docs.google.com/forms and create a form

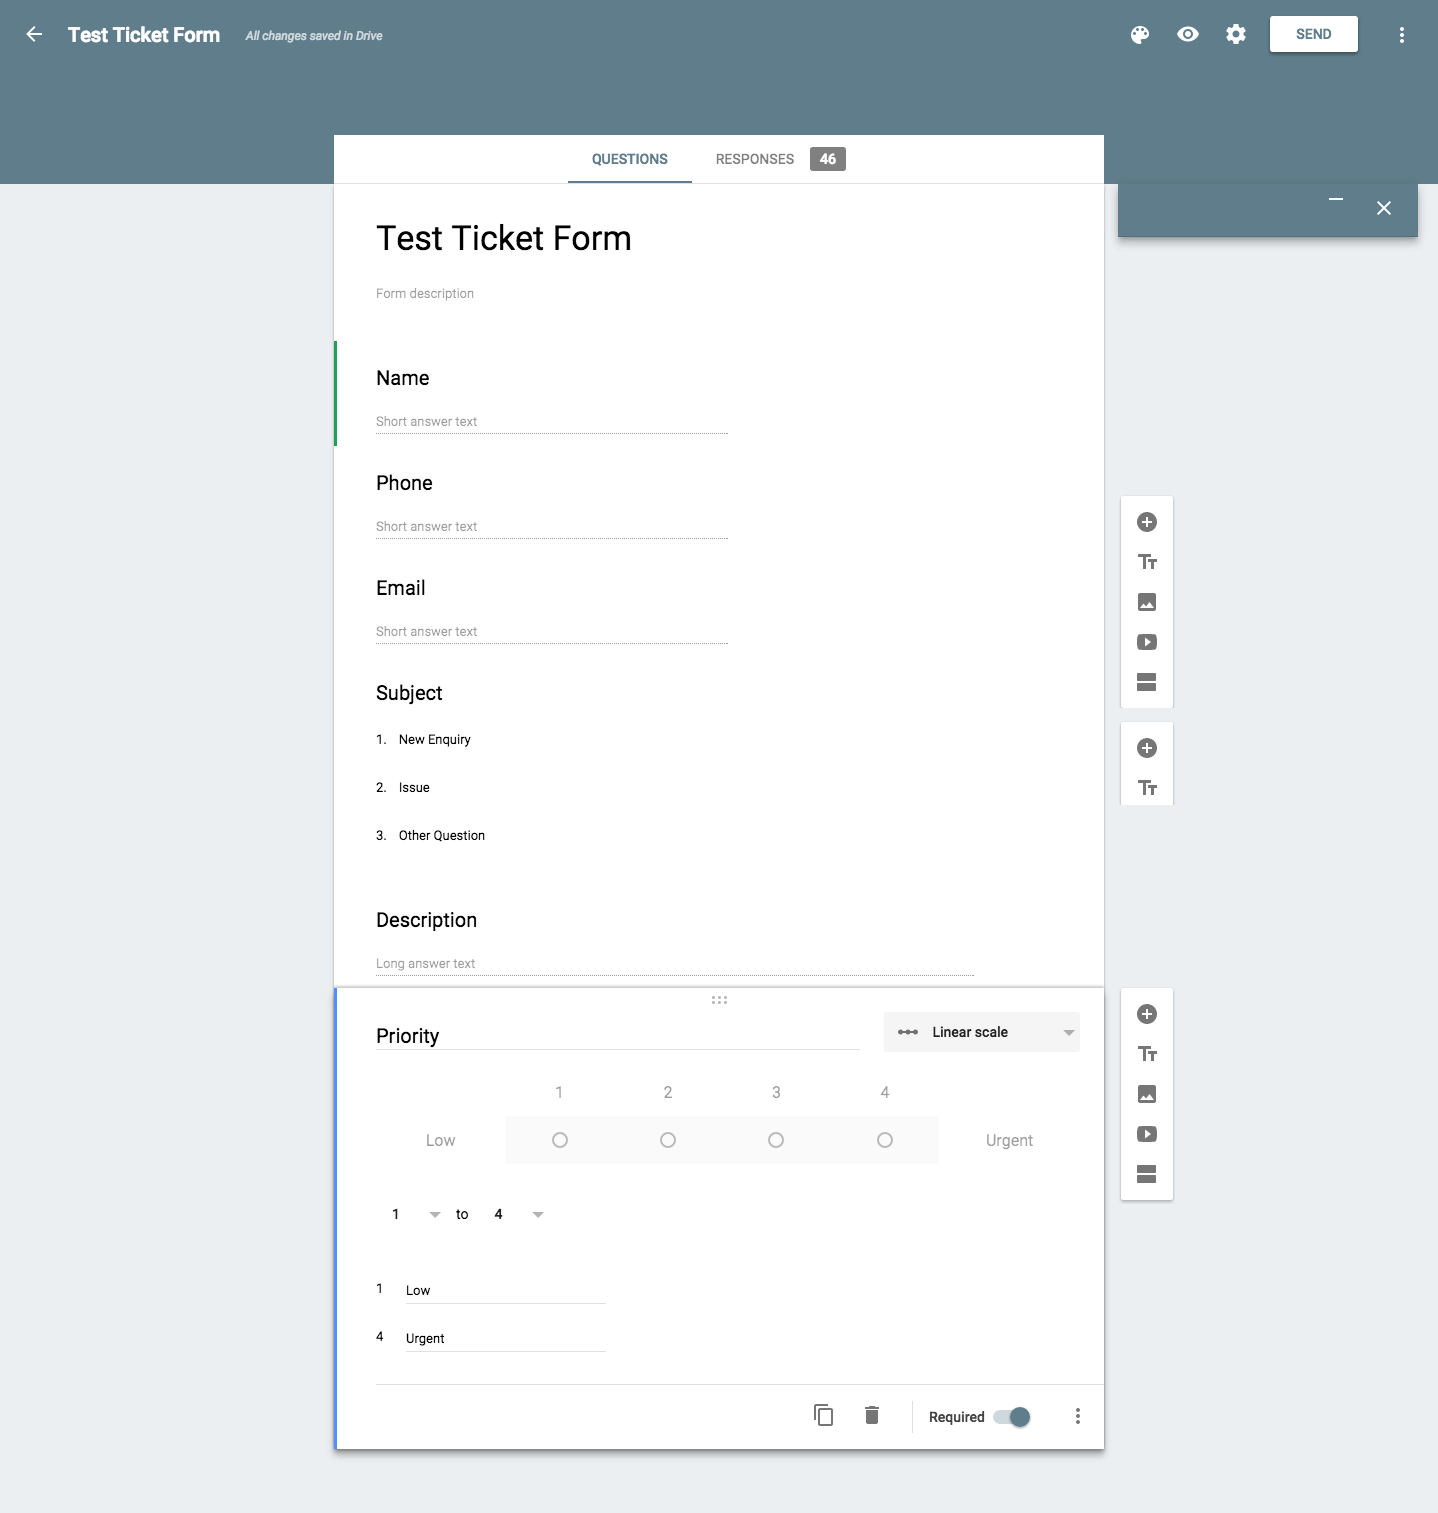
Using the form editor give your form a name, apply styling etc and add your questions, one by one, setting mandatory ones as required.
In this example I have set up
- Name – short text
- Phone – short text
- Email – short text
- Subject – Pull down choices
- Description – Long text
- Priority – Number choices from 1 to 4 (Linear Scale)
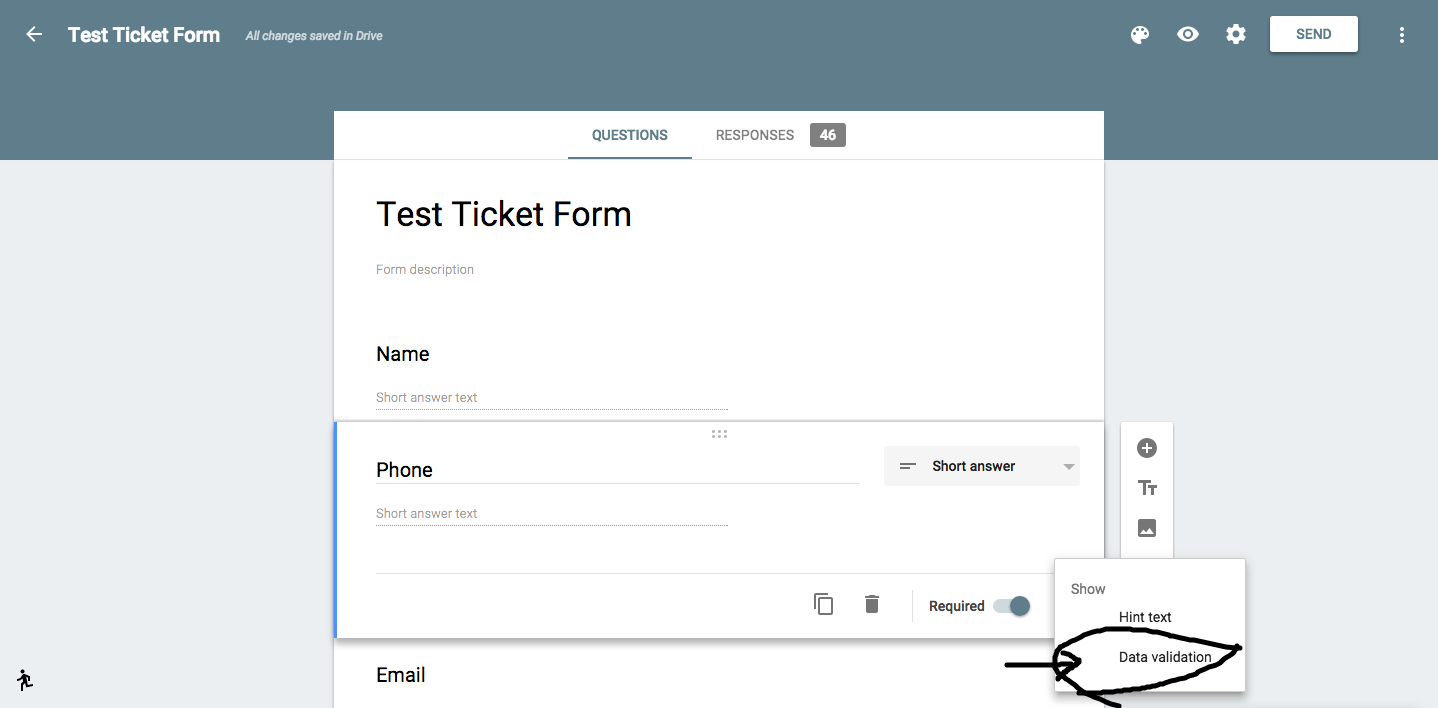
And then add some validation to the fields. With Google Forms you can perform advanced validation including using Regular Expressions.
Inside a form field, on the bottom right, click on in the three vertical dots and tick ‘Data Validation’ to reveal the extra options.
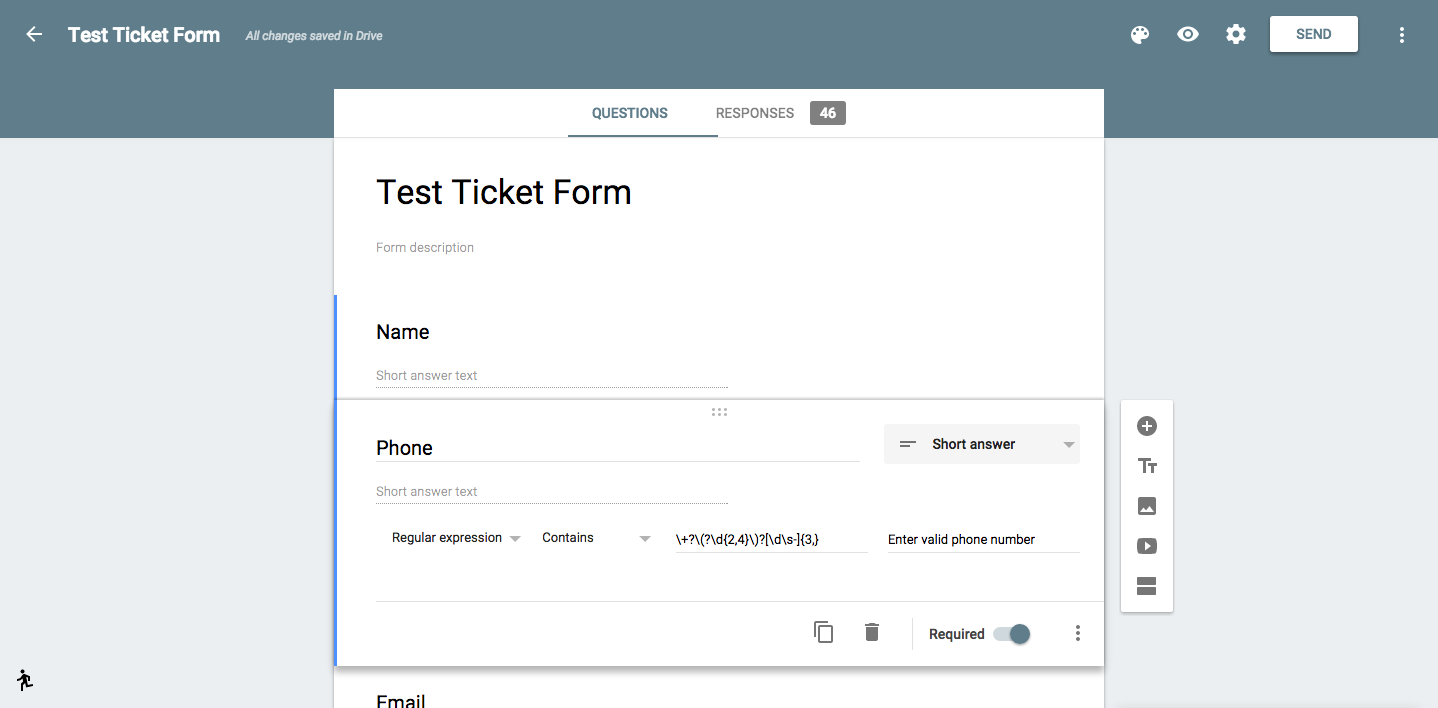
For the phone number we select regular expression, and apply a validation for phone number, this expressio
\+?\(?\d{2,4}\)?[\d\s-]{3,}
should cover most phone number formats, and add an appropriate custom message, like this
Repeat for other fields, e.g. for email validation you can use
[a-zA-Z0-9_\.\+-]+@[a-zA-Z0-9-]+\.[a-zA-Z0-9-\.]+
which should work for most email address formats http://www.labnol.org/internet/regular-expressions-forms/28380/
Test your form, using the eye icon (preview) at the top right.
Step Two – Create a Google Sheet that is attached to your Google Form
This is a simple, but necessary step. Whilst Google Forms can accept entries without a Sheet, we will need the sheet, as that is where the Google Script will run to make the API call.
First, on your form in ‘edit’ mode, click on ‘responses’ tab – and then click on the green ‘create sheet’ icon on the right top corner.
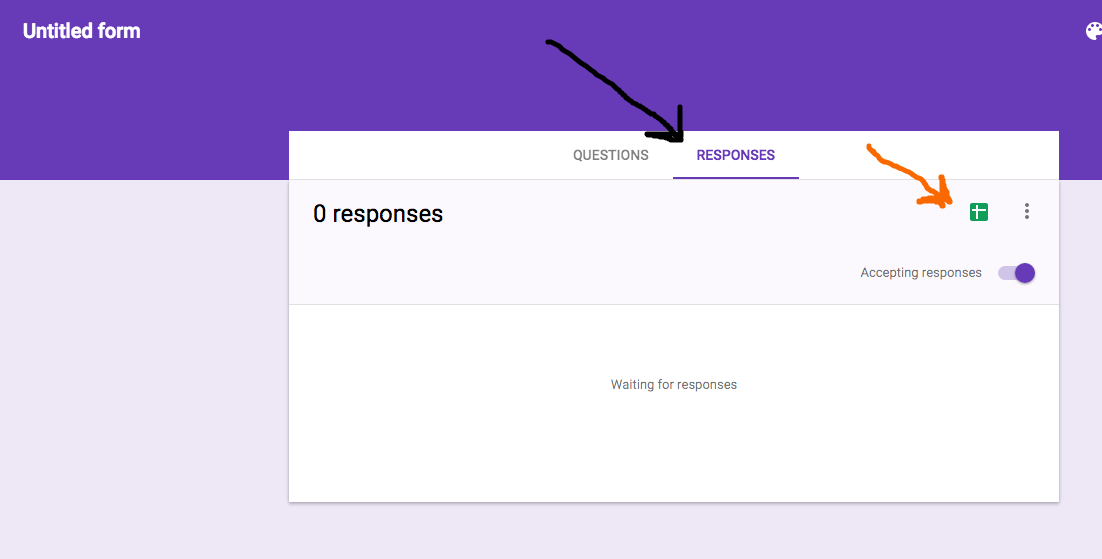
And follow the the prompt to create your spreadsheet

This will create a Google Sheet for you.
Step Three – Write a Script to call the API
In this example I am calling FreshDesk.
Most APIs are very similar and most are REpresentational State Transfer (REST), allowing you to make “RESTful” operations like read, modify, add or delete data. So this example can be adopted to many systems, not just FreshDesk. Detail will vary of course, in terms of authentication and methods.
First find you Google Sheet and open it, and on the top menu go to tools > script editor and delete anything that is already there.
The first bit of code to add is
function Initialize() {

  try {

    var triggers = ScriptApp.getProjectTriggers();

    for (var i in triggers)
      ScriptApp.deleteTrigger(triggers[i]);

    ScriptApp.newTrigger("SubmitGoogleFormData")
      .forSpreadsheet(SpreadsheetApp.getActiveSpreadsheet())
      .onFormSubmit().create();

  } catch (error) {
    throw new Error("Please add this code in the Google Spreadsheet");
  }
}
This function basically calls another function
SubmitGoogleFormData
when the form is submitted, all the API work is done in SubmitGoogleFormData, the the initialize script just prepares the the ground work.
The structure of SubmitGoogleFormData is as follows,
function SubmitGoogleFormData(e) {

  if (!e) {
    throw new Error("Please go the Run menu and choose Initialize");
  }

  try {

 //  this is where the API code goes

  } catch (error) {
    Logger.log(error.toString());
  }
}
The ‘try’ section is where the API code goes.
Lets now examine the specifics relating to calling the API
To start off, we will not call FreshDesk but requestbin – requestbin used to be pastebin as far as I know, create a requestbin here http://requestb.in and you will get a url that you can use effective as a dummy API URL – something like http://requestb.in/162683gg
The main call simply has url & options as parameters
var response = UrlFetchApp.fetch(url, options);
So adding the URL for requestbin is straight forward.
var url = "http://requestb.in/162683gg";
var response = UrlFetchApp.fetch(url, options);
Building the options is a bit more complex, but essentially it has too important components
- header – used primarily for authentication
- payload – use to deliver the required data (from the form) to the destination system
The details of exactly what goes into each will vary by destination system and you will have to refer to the API documentation.
For this example (as it applies to FreshDesk ) I will assume that authentication is ‘Basic’ and that the payload is JSON.
Lets build the main payload data first, lets first grab the columns we need, the following code works for my example – but you will need to look at your results spreadsheet to check where the columns are, because that get set by the sequence you build the form. So take a look at you own results sheet.
// Grab the columns

      var
        ss = SpreadsheetApp.getActiveSheet(),      // get the active sheet
        lr=ss.getLastRow(),                        // get the last row
        fn = ss.getRange(lr, 2, 1, 1).getValue(),  // column 2 First Name
        pn = ss.getRange(lr, 3, 1, 1).getValue(),  // column 3 Phone Number
        em = ss.getRange(lr, 4, 1, 1).getValue(),  // column 4 email
        r = ss.getRange(lr, 5, 1, 1).getValue(),   // column 5 description
        p = ss.getRange(lr, 6, 1, 1).getValue(),   // column 6 priority
        t = ss.getRange(lr, 7, 1, 1).getValue();   // column 7 subject
Once we have the columns data of the last row of the active sheet into variables we can structure the payload, as FreshDesk uses json this is what I did
var payload = {
    "phone": String(pn),
    "name": String(fn),
    "subject":  String(t),
    "description": String(r),
    "email": String(em) ,
    "priority":p,
    "status":2,
    "source":3
  }
Refer to FreshDesk ticket API for details http://developer.freshdesk.com/api/#tickets
Now we need to build the authorisation header, FreshDesk uses Basic auth and can do this using an API token (or user:pass) I chose the token thus,
var headers = {
    "Authorization" : "Basic " + Utilities.base64Encode('99uEzPjdf3U6crJHr35p:X')
    };
The token (or user:pass) needs to be base64 encoded
The last step is to build up the options from the payload & headers, note the use of JSON.stringyfy on the payload data
var options = {
      'method': 'post',
      "contentType" : "application/json",
      'headers': headers,
      'payload': JSON.stringify(payload),
      'muteHttpExceptions': false
    }
If we put this all together, we will be able to check the right data is being constructed, by firing this up and examining (refreshing) requestbin.
Our test code should look like this
function Initialize() {

  try {

    var triggers = ScriptApp.getProjectTriggers();

    for (var i in triggers)
      ScriptApp.deleteTrigger(triggers[i]);

    ScriptApp.newTrigger("SubmitGoogleFormData")
      .forSpreadsheet(SpreadsheetApp.getActiveSpreadsheet())
      .onFormSubmit().create();

  } catch (error) {
    throw new Error("Please add this code in the Google Spreadsheet");
  }

function SubmitGoogleFormData(e) {

  if (!e) {
    throw new Error("Please go the Run menu and choose Initialize");
  }

  try {

//  this is where the API code goes

// Grab the columns

      var
        ss = SpreadsheetApp.getActiveSheet(),      // get the active sheet
        lr=ss.getLastRow(),                        // get the last row
        fn = ss.getRange(lr, 2, 1, 1).getValue(),  // column 2 First Name
        pn = ss.getRange(lr, 3, 1, 1).getValue(),  // column 3 Phone Number
        em = ss.getRange(lr, 4, 1, 1).getValue(),  // column 4 email
        r = ss.getRange(lr, 5, 1, 1).getValue(),   // column 5 description
        p = ss.getRange(lr, 6, 1, 1).getValue(),   // column 6 priority
        t = ss.getRange(lr, 7, 1, 1).getValue();   // column 7 subject

// put columns into API payload
var payload = {
    "phone": String(pn),
    "name": String(fn),
    "subject":  String(t),
    "description": String(r),
    "email": String(em) ,
    "priority":p,
    "status":2,
    "source":3
  }
// set up authorisation
var headers = {
    "Authorization" : "Basic " + Utilities.base64Encode('99uEzPjdf3U6crJHr35p:X')
    };
//build up options
var options = {
      'method': 'post',
      "contentType" : "application/json",
      'headers': headers,
      'payload': JSON.stringify(payload),
      'muteHttpExceptions': false
    }
// set API method URL  - requestbin
    var url = "http://requestb.in/162683gg";
// make the call
    var response = UrlFetchApp.fetch(url, options);
// log the response (useful for debugging )
    Logger.log(JSON.stringify(response));

  } catch (error) {
    Logger.log(error.toString());
  }
}
Now it is time to test
Within the script editor
- Save your script
- Run > Initialize
Once you have done that, go to your Google Form and input an entry, if all is well, you should be able to go to your requestbin url, hit refresh and see nicely structured form data. If you do, move on, if you don’t take a look in the script editor View > Logs to try and find out what when wrong.
So in my example, with FreshDesk, there is just one change now, setting the right API url
var url = 'https://mydomain.freshdesk.com/api/v2/tickets';
Of course mydomain needs to be your FreshDesk domain.
And start testing, if all is correct you should be creating tickets from your form.
The above uses moderately advanced techniques and the tutorial is intended for those with programming / development experience.
If you have business processes and system integrations requirements that could benefit your business and you don’t have the skills, knowledge or time, why not contact us at Fullworks and see how we can help your business and teams become more effective through technology.
by
Tags:
Comments
4 responses to “Integrating Google Forms / Sheets to External API”
-
Do you think it is possible make a website to share Google form links, and when the user answer the forms linked the website gets aware of it? If you think it’s possible, what would be the best tools?
-
Yes of course.
It all depends on the Website technology of course. For instance if it was WordPress you a can basically use this tutorial, and use the REST API. So for instance you could create a Cutom Post Type, exposed to the REST API, use an authentication method and add a custom post for each form entry.
Why you would bother ( with WordPress specifically) when you can build the form directly in the website anyway, is a different question.
-
-
After submitting the google data to the API endpoint, I would like to return the ticket_id generated and show it to the google form user. How can I do that ?
-
I don’t actually know, but when you find out, please come back and let us all know.
-
Leave a Reply