I recently set up a Raspberry Pi as Chromium Kiosk so I could display a webpage on a wall mounted TV screen. I have written what I did in an easy to follow recipe format. If you follow configuration steps carefully you should be successful in setting up your Raspberry pi to work as a kiosk.
Ingredients
- Raspberry Pi 3 B wireless
- 16Gb micro sd card
- HDMI Cable
- USB power cable
- Case
- Temporary USB Keyboard & USB mouse
Preparation and Cooking time
About 1 to 2 hours depending how many mistakes you make and start again 🙂

Method
Preparation
- Download Raspberian Stretch Lite from https://www.raspberrypi.org/downloads/raspbian/
- Unzip on to your computer
- Obtain Etcher to burn the image onto the SD card
- detailed instructions https://www.raspberrypi.org/documentation/installation/installing-images/README.md
First Boot
Insert SD card to Raspberry. Plugin HDMI to Raspberry – TV / Monitor. Plugin in USB keyboard. Plugin the power, should boot to a login screen.
user: pi
password: raspberry
Basic Setup
Set up secure password (option 1) – as SSH opens up access
Set up host name ( option 2)- makes it easier to find for login in as SSH
Set up Boot Options (option 3 -> B1 – >B2 ) – we will want the Raspberry to Boot into Console / Autologin
Set up SSH (option 5 -> P2 ) – this is important – as once you set up a true kiosk you can’t login, so SSH gives you away to set up easily. (option 5 -> P2 )
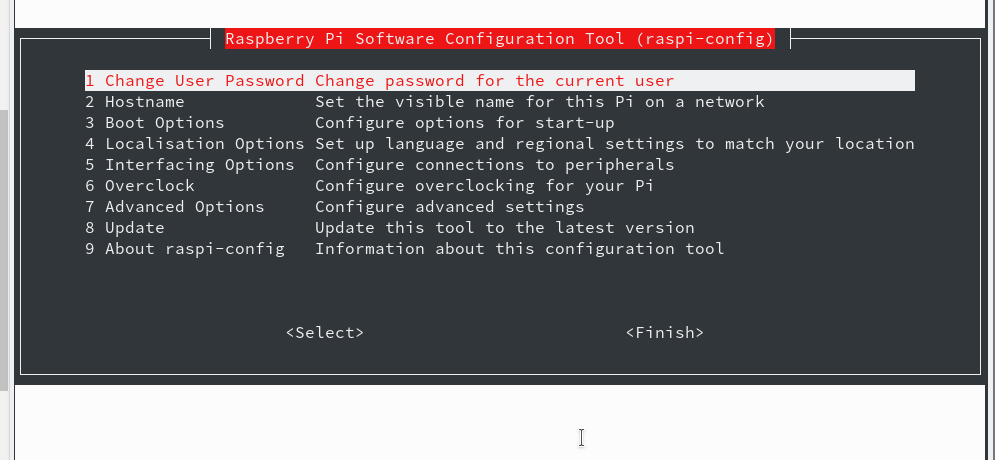
This is all done by the Raspberry Configuration tool
sudo raspi-config
Set up Wireless Access
If you are not using an ethernet cable you will need to set up Wireless access. Raspberry instructions here https://www.raspberrypi.org/documentation/configuration/wireless/wireless-cli.md
Edit the config file ( I will use vi but you can use nano ).
sudo vi /etc/wpa_supplicant/wpa_supplicant.conf
and add a network, you can generate this with
wpa_passphrase yourSSID yourwirelesspassword
which outputs
network={
ssid="yourSSID"
#psk=" yourwirelesspassword"
psk=fdcdd08a9d6bd739f544a902c1a59dd8a7eedea30b4e4ba1afa61d3cf01222df
}
so you can if you want to be fast and if you like to append directly
sudo wpa_passphrase yourSSID yourwirelesspassword >> /etc/wpa_supplicant/wpa_supplicant.conf
I found I had reboot to activate.
sudo reboot
Test SSH
OK you should be all ready to test connecting from your computer on the same lan via SSH
linux or Max terminal
ssh your-pi-hostname -l pi
password:  yourpasswordyouset
If you are on Windows, you will probably use Putty for SSH.
and you should be in!
Install all the software needed
sudo apt-get update
to make sure all is updated ( and you are connected to the internet )
sudo apt-get install chromium-browser
to get Chromium
you will also need xinit
sudo apt-get install xinit
and xdotool
apt-get install xdotool
Setting up the X window
Before going full kiosk lets see if Chromium will launch.
edit the .xinitrc file in pi home directory
vi ~pi/.xinitrc
and input
#!/bin/sh
WIDTH=`xwininfo -root|grep Width | awk '{ print $2}'`
HEIGHT=`xwininfo -root|grep Height | awk '{ print $2}'`

exec chromium-browser --window-size=$WIDTH,$HEIGHT
The width and height are there as I found Chrome doesn’t know how to go full size. You can apparently to it in chromium defaults file, but this way is easier.
Now login on the console (not via SSH) via the keyboard and mouse attached to the pi and type
startx
Chromium should launch and you should be able to browse the web
Set up the Kiosk
we add
xset s off
xset s noblank
xset -dpms
to turn off screen savers
We add an hourly loop ( if required, or adjust the time in seconds ) to refresh the page (ctrl-F5)
(
while true
do
sleep  3600
xdotool key "ctrl+F5"
done
) &
and some more options to chromium –
-incognito --kiosk http://your-site
I also found I needed this –disable-webgl as one webpage page wasn’t displaying properly, so the final file is
#!/bin/sh
WIDTH=`xwininfo -root|grep Width | awk '{ print $2}'`
HEIGHT=`xwininfo -root|grep Height | awk '{ print $2}'`
xset s off
xset s noblank
xset -dpms
(
while true
do
sleep  3600
xdotool key "ctrl+F5"
done
) &
exec chromium-browser --window-size=$WIDTH,$HEIGHT --disable-webgl --incognito --kiosk http://your-site
Start it on login
And then we want to auto start on login, I found the easiest was was to use .profile ( rc.local seemed to load too early )
vi ~pi/.profile
and add
if [ -z "$SSH_TTY" ]; then
    startx -- -nocursor
fi
The if statement just stops us trying and failing to launch when an SSH login
— -nocursor removes the mouse cursor
Tidy up boot up messages
Finally, when the PI is connected to the usb port of the monitor it will boot on power up, but there re lots of boot messages. I manged to get rid of most of them by editing cmdline.txt
sudo vi /boot/cmdline.txt
and adding this to the single line
loglevel=0 logo.nologo quiet
and also changing console=tty1 to console=tty3
Back it up
Nothing worse than doing all the work and then some how your SD card get corrupted – Backup the SD card.
Backup instructions here https://www.raspberrypi.org/documentation/linux/filesystem/backup.md
for linux users, put the card in your machine, find out what device it is and
sudo dd bs=4M if=/dev/sdbx of=raspbian.img
where /dev/sdbx is the actual device name of your card of course
Did I miss anything?
I wrote this after the fact, so I could remember what I did if and when I do it again. I may have missed something, or something may need a better explanation, please use the comments box to let me know.
by
Tags:
Comments
18 responses to “Recipe for a Raspberry Pi Kiosk”
-
Hi Alan,
Thanks for this, I’d been trying to get this to work on stretch with limited success. Frankly I’m still having limited success so thought I’d run it by you.
Followed the recipe(Recipe for a Raspberry Pi Kiosk), had to add libgtk3 and use startx for testing, but the darn thing is always booting into a root term after launcing chrome as pi user. So I exit the term and there’s the browser.
~/.xinitrc and ~/.profile are 755 so I’m not clear on where the root term is coming from. Also having no luck getting rid of the fruit splash and init garble but that’s a ‘who cares’.
Any guesses?
Here’s the .xinitrc which I believe is a cut and paste from yours though I commented out WIDTH HEIGHT to see if that had any impact (none).
#!/bin/sh
#WIDTH=`xwininfo -root|grep Width | awk ‘{ print $2}’`
#HEIGHT=`xwininfo -root|grep Height | awk ‘{ print $2}’`
exec chromium-browser # –window-size=$WIDTH,$HEIGHT
xset s off
xset s noblank
xset -dpms
(
while true
do
sleep 10
xdotool key “ctrl+F5”
done
) &
exec chromium-browser –window-size=$WIDTH,$HEIGHT –disable-webgl –incognito $-
Did you use Stretch Lite? or Full Stretch?
-
Lite, not sure where I deviated from the recipe. Shocking too since I worked in restaurants through college and became a papered sous chef. Dang. Sauce may be broken and I’d prefer to add a bit of ice water as opposed to doing it again but if that’s the case it is what it is.
-
Tried again, worked perfectly so my first time I goofed along the way. Thanks much for your work on this. 🙂
-
Great it worked for you
-
-
-
-
-
Thanks, Alan. There’s many different recipes for Raspberry Pi kiosks, but this seems to be the cleanest solution. I appreciate your instructions on how to tidy-up the boot screen, too. After quite a bit of Googling this recipe was the only one to work well for me on Raspbian Stretch. Thanks again!
-
Also, there’s a small typo I noticed: at the end of the section “Setting up the X window” the command “xstart” should be “startx”.
Best,
Spencer-
Cheers, edit made
-
-
-
Thanks for the excellent post!
I am using this as a web browsing kiosk, with a cursor/mouse/keyboard enabled. How would I make sure that startx/chromium-browser is restarted any time that the browser window is closed?
If I really want to shutdown, I will do it through SSH.
-
Hi,
the simplest way is to write a shell script that checks if the chromium process exists ( actually you might get away with just restarting chromium-browser without checking ) and if not restarts it. Probably best to run that in cron every few seconds. There are several examples out there on stackexchange.Alan
-
-
Hi Alan, firstly excellent write up! I wish i could have stumble upon your project much sooner, i could have saved myself so much time. But my journey with my build was nice, but not an easy one…
Nevertheless i wish to share my experience with using some of your build here. Such like the part where one wants to have Chromium refresh after a given time. I used xdotool as well, however i battled finding in which startup file to place the loop portion to refresh the browser after a certain time. Long story short, i had my loop happening at the end of my autostart file instead of placing it where you did with your build. So i placed it where you did and it worked like a charm! Thanks again for this nice post.
Also on another note and hopefully it can help others. On your “Tidy up boot up messages” section, this did not work for me entirely. And i also made use of the Raspbian Stretch Lite distro.
Followers can try as you mentioned at the end of the line to add ‘fbcon=map:2’ (without the quotes) instead. This removes EVERY boot message along with logos and all. One thing i do notice when using it, is that boot time appears to be longer and the browser seem to take longer with starting up. Just my 2 cents worth…
-
Thanks for taking the time to comment
-
-
Small tip, add also chromium param:
–window-position=0,0
to make the browser center correctly.
-
Thanks for the tip – I didn’t notice an issue with centre on my implementation, I’ll have to take a closer look as I didn’t look too hard :).
-
-
This may be a good starting point for my project, but I am trying to do something very specific. Here is my goals. I am currently working in a busy kitchen. At the moment all of our recipes are scribbled haphazardly on pieces of paper. We have to flip through note pads, find what we’re looking for, make adjustments, etc. It’s a pain. I’m trying to make a simple kiosk for my boss that includes all the recipes they have, along with pictures of various meals that we fix in the kitchen. Here’s what I want it to do.
It should boot into the kiosk. Not sure how I want it to look yet. I’ll get to that. I want it to include all of our recipes. Doesn’t have to be touch screen. We are working in a kitchen after all. Might be messy. They should be able to scroll through the menu. Edit existing entries and add new stuff as needed. Also they should be able to add pictures or change existing pictures. There should be search capabilities so they can quickly find the recipe they’re looking for. In other words, I am literally looking for a recipe kiosk. I searched Google for information but all I get are recipes of code to build a kiosk. Not for like literal recipes of food. LOL.
Any advice, tips, suggestions, etc, you may have would be greatly appreciated and will definitely make me look good if I am able to get something like this working. It could literally change my life. I assume I might need 2 raspberry pis. One to run the kiosk and one to act as a server. I am somewhat experienced with python, but its been a long time. May need you to refresh my memory on what direction to take. Never thought a kitchen job would throw me back into programming, but go figure.
-
An interesting project. Fist you wouldn’t need two raspberry pi’s as the pi is a full linux machine and as such is multi tasking and can act as a server – but I wouldn’t it that way.
First you don’t want a full Kiosk solution you just want the pi to auto boot up – launch chrome and go to a custom website with your recipes – but you still want a ( wireless ) keyboard & maybe mouse, ( you can get remote control sized wireless keyboard/mouse combined e.g. ) attached to the pi so you can navigate the recipe website.
I would build the recipe website as a separate solution and host it on a low-cost host e.g. Guru take a look at this link – why bother waisting time and effort configuring a webserver when your boss can pay £4.99 / month?
I would build the website in WordPress – because you can get something up easily enough and build the design / search / navigation as you please without needing to get into code – and thus allow ‘users’ to be editors etc all built in. And you can lock it down so the ‘public’ can’t see it only your own IP or with a password…
-
Excellent. Thanks for the swift reply! I’ll run it by my boss and see what he thinks. Although I doubt they’ll want to pay for hosting. That would be the easiest solution. You’re right about setting up a private server being a bit too much as well. Maybe I’m thinking too big. Maybe there is a simpler way to accomplish the same result. Perhaps a kiosk is the wrong way to go.
I think I can still make the raspberry pi work as its cheap, then maybe just write a simple program that uses an easy database like sqlite or something like that, but then I’ll have to design the interface and all that. Sigh…This is giving me a headache. Maybe there is an even simpler way I haven’t considered. I have a habit of being overly ambitious. Thanks, though. I’m sure I’ll figure something out.
-
-
-
You would end up doing thousands of ££ worth of your (free?) time to create ( pardon the pun ) a half baked solution for your boss to avoid trivial costs.
Having thought about it I wouldn’t write any code or even use a raspberry pi. I’d by a cheap android tablet and a chromecast to throw to up onto the screen. I would then use an app to store / display the recipes – the free Google apps should be enoug – I would look at Google Keep ( see https://www.google.com/keep/ )- easy to use and ideal for search / photos / bullet point lists ( which is what a recipe is ).
No coding. Less than £100 hardware – none of your free time working for the boss coding things that you dont need to.
Leave a Reply to Alan Cancel reply