Google Compute Engine comes with an incremental snapshot capability.
The product doesn’t have a specific automated method to take snapshots and to tidy them up either, but scripting using the gcloud command line is fairly straight forward, once you understand the power of the command line.
I have seen many attempts at automating this using bash scripts, python and even ruby, but in the main complex scripting isn’t actually required.
For my purpose I have used bash as the scripting language, but you will see that all is required is two simple loops and could be implemented in any scripting language that can execute commands.
Before we begin, you will need to have install the Google Cloud SDK which includes the gcloud command line interface (cli) this is available for most platforms here. https://cloud.google.com/sdk/downloads
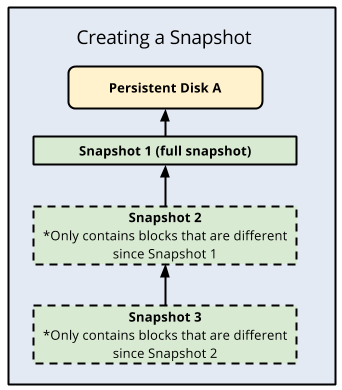
Additionally, it is well worth understanding a bit about Persistent Disk snapshots, in the way they work incrementally.
Compute Engine stores multiple copies of each snapshot redundantly across multiple locations with automatic checksums to ensure the integrity of your data. You cannot share snapshots across projects.
If you delete snapshot 1 all the data in 1 gets migrated into snapshot 2. As it is incremental you are not really duplicating a lot of data, all depending on the volatility of the data on your server.
You would have to delete ALL snapshots for a disk to effectively start again, otherwise you are always building on the previous image. For systems that are relatively static this makes a very cost effective and simple snapshot solution.
Also read the part about consistent state of data. In a highly volatile data environment suspending updates and flushing data is important, for a more static environment (e.g. serving simple websites ) this is less so.
The use case for this script is to list all disks in a project ( regardless of what server they are mounted on ) and to take a snapshot.
The second function, is simply to delete older snapshots where granularity is no longer required, remember deleting old snapshots doesn’t lose data it just pushed it into the more recent snapshots. Strictly speaking there is no real need to delete snapshots, but too many would be unmanageble.
Therefore we need two loops.
The elements of loop 1 are:
gcloud compute disks list --format='value(name,zone)'
Which lists all disks in a project – the format=’value(name,zone)’ forces the command to return a tab delimited list without headings, containing name & zone. There are other format options, see https://cloud.google.com/sdk/gcloud/reference/topic/formats , so you can choose what is best for you, but this works nicely with a bash loop.
then
gcloud compute disks snapshot $DISK_NAME --snapshot-names autogcs-$DISK_NAME-$(date "+%Y-%m-%d-%s") --zone $ZONE
which uses the list to create snapshots appropriately prefixed and named ( so we can find the ones created by the script.
The elements of loop 2 are:
gcloud compute snapshots list --filter="creationTimestamp<$(date -d "-60 days" "+%Y-%m-%d")" --regexp "(autogcs.*)" --uri
Which lists all snapshots will a creation date less than, in this case, 60 days. This is driven by the –filter= expression, it seems that the filter handles dates and partial dates without any need for specific conversions. It also only lists snapshot with a prefix of “autogcs-” that we set earlier, to stop deleting other manual snapshots, this is done by the flag –regexp=”(autogcs.*)” (although I suspect that this could be incorporated into –filter). The final flag –uri returns a full path needed in the delete.
and then for each found
gcloud compute snapshots delete $SNAPSHOT_URI
Which should be self explanatory.
If you would like the full bash script and also details on how to install and set up cron job you can find it here https://gitlab.com/alan8/google-cloud-auto-snapshot
Please leave any comments or suggestion below or at gitlab.
Leave a Reply