• Home
  • Cloud
    • General
    • SaaS
    • BPaaS
    • PaaS
    • IaaS
    • Other Internet Hosted Applications
      • WordPress
        • WooThemes Canvas
          • WooThemes Canvas CSS
  • About me
  • Why Badly Wired?
  • Contact

Badly Wired

Alan's technical notebook - WordPress and other stuff

You are here: Home / Code snippets / Linking WooCommerce to a Spreadsheet using Google Sheets and the REST API

Linking WooCommerce to a Spreadsheet using Google Sheets and the REST API

22nd August 2018 by Alan 18 Comments

Fully Managed UK Hosting - Only £1+VAT till 1st Jan 2021 on Shared, Reseller and Dedicated Hosting! .... read more ....

IMPORTANT NOTE

As of 22 Oct 2019 – this script seems to be in an infinite loop – so use this as a coding concept ONLY.

I will debug it in due course, and update – BUT if you spot the issue first please do leave me a comment below with your solution.

Fully Managed UK Hosting - Only £1+VAT till 1st Jan 2021 on Shared, Reseller and Dedicated Hosting! .... read more ....

Following on from my previous tutorials on Google Sheets and WordPress Rest API some people have asked me if you can do the same with WooCommerce.

Indeed you can.  WooCommerce has  REST API that provides access to any data you need. You can find the technical documents here.

One of the main differences is that WooCommerce comes with an authentication method ( so you don’t need to add a method like you did here ).

Lets assume you are familiar with Google Sheets and Google Scripts ( if not go back to the first tutorial and at least do the basics of getting posts ).

And if you are reading this, we will assume you have a working copy of WooCommerce with some data in it ( ideally a test system to play with ) if so we a re set to get going.

Lets cover authentication first

Most useful data from WooCommerce is likely to be private, e.g. Orders or updating Product prices, so whilst the other tutorials started with getting  public data and moved on to private data, lets dive straight in ( another reason to at least have covered the basics here ).

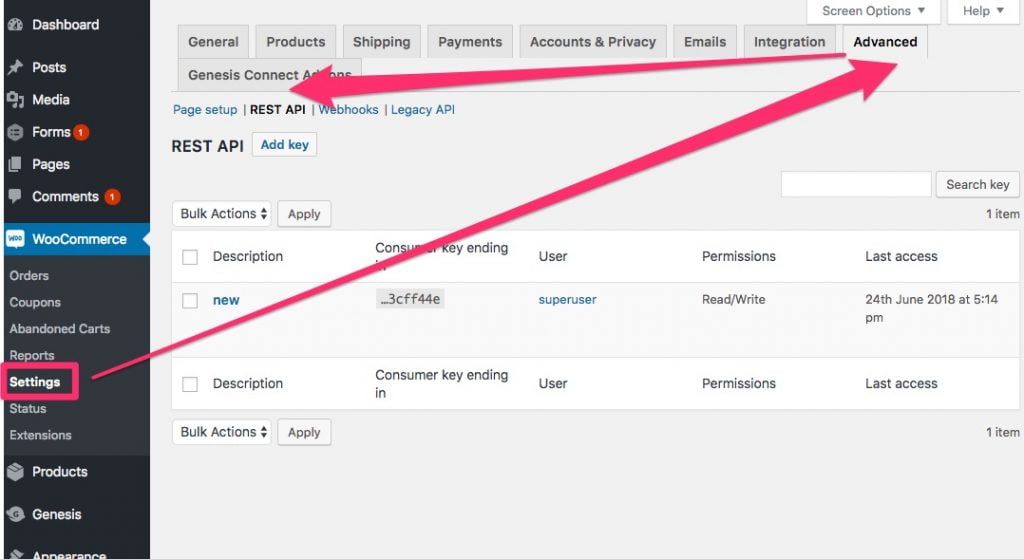
Set up WooCommerce keys

Login to and go to WooCommerce settings > advanced > api and create a key, with read/write permission and save a copy as you will need this for the script.

Add the code to get the credentials

Editing the script is from the spreadsheet Tools>Script Editor

Open this up and replace the content with

function onInstall(e) {
  onOpen(e);
}
function onOpen(e) {
  // setup a custom menu
  SpreadsheetApp.getUi().createAddonMenu() 
      .addItem('Get Orders', 'getPosts')
      .addItem('Set Domain Name credentials', 'getDomain')
      .addToUi();
  setupSheet();
}
function getDomain() {
  var html = HtmlService.createHtmlOutputFromFile('credentials')
      .setWidth(200)
      .setHeight(200);
  SpreadsheetApp.getUi().showModalDialog(html, 'Connect to WordPress');
}


Save this script giving it a name you can remember and makes sense e.g. Woo Orders.

What this does is
1. Sets up a menu under Add Ons with two options – Get Orders and Set Domain Name Credentials
2. Defines a function that runs a file called credential.html , which will contain our input form

In the script editor,  go to File>New>HTML file and create a file named  credentials.html with your html form code as followsSave your script.  Go back to your spreadsheets and refresh. Under add-ons you should now have a new menu e.g. Woo Orders where you can input the credentials you set up above.

<link rel="stylesheet" href="https://ssl.gstatic.com/docs/script/css/add-ons1.css">
<form id="loginform">
  <div class="form-group">
    <label for="domain">Domain inc. https://</label>
    <input type="text" id="domain" name="domain">
  </div>
  <div class="form-group">
    <label for="key">Consumer Key</label>
    <input type="text" id="key" name="key">
  </div>
  <div class="form-group">
    <label for="secret">Consumer Secret</label>
    <input type="password" id="secret" name="secret">
  </div>
  <div class="block form-group">
    <button class="action" onclick="google.script.run.processCredentials(this.form)" >Submit</button>
  </div>
</form>


Getting the Orders into the spreadsheet.

First we want a function that will retrieve the form data (credentials) and store it in persistent data storage with the form

function processCredentials(myForm) {
  PropertiesService.getDocumentProperties().setProperty('domain', myForm.domain);
  PropertiesService.getDocumentProperties().setProperty('consumer_key', myForm.key);
  PropertiesService.getDocumentProperties().setProperty('consumer_secret', myForm.secret);
  SpreadsheetApp.getUi().alert('Saved, hit OK and the script will try to get the products, this may take a while');
  getOrders();
}

This function also kicks of the main function getting the orders.

The getOrders function has to get the orders in chunks ( or pages as we should call them ) as there are limits on the number of orders that can be return in one go, this is to protect your server mainly.

The function first check to see if we have stored credentials.
Then loops through at 50 orders per page.
Then finally outputs the buffer built up.

function getOrders(){
  if ( PropertiesService.getDocumentProperties().getProperty('domain') == null ) {
    getDomain();
    return;
  }
  setupSheet();
  // loop here as we need get back posts in chunks, Rest API max is 100 post
  var offset = 0;
  var per_page = 50;
  var page = [];
  var values = [];
  
 do {
    page=getPage(offset,per_page);
    offset+=page.length;
    for (i = 0; i < page.length; i++) {
       values.push(page[i]);
    }
  } while ( page.length > 0 );
  
  
  //output range
  var ss = SpreadsheetApp.getActiveSpreadsheet();
  var sheet = ss.getSheets()[0];
  var range = sheet.getRange(2, 1, values.length, 15);
  range.setValues(values);
}

The main API call is made in the next function.   The authorisation is using basic auth – but sometime there are issues if JWT token are also in use or the server has a problem, so an alternative is query string for key & secret, see the commented out API line.

It retrieves the data and pushes it into a structure.  HereI have a double loop so i can output multi line items.

function getPage(offset,per_page) {
  
  // gets posts in chunks of per_page
  var ui = SpreadsheetApp.getUi();  // used for error messages
  var ss = SpreadsheetApp.getActiveSpreadsheet();
  var page = [];
  
  // set up authorisation
  var headers = {
    "Authorization" : "Basic " + Utilities.base64Encode(PropertiesService.getDocumentProperties().getProperty('consumer_key')+':'+PropertiesService.getDocumentProperties().getProperty('consumer_secret'))
    };
  
  var options = {
      'method': 'get',
      'headers': headers,
      "contentType" : "application/json",
      'muteHttpExceptions': false
    }
  
  var apiHost = PropertiesService.getDocumentProperties().getProperty('domain')+'/wp-json'; 
  // altenative to basic auth in case that doesn't work nicely e.g. you have JWT token plugin too.
  // url = apiHost + '/wc/v2/orders?per_page='+per_page+'&amp;offset='+offset+ '&amp;consumer_key='+PropertiesService.getDocumentProperties().getProperty('consumer_key')+'&amp;consumer_secret='+PropertiesService.getDocumentProperties().getProperty('consumer_secret');
  //
  url = apiHost + '/wc/v2/orders?per_page='+per_page+'&amp;offset='+offset;
  try {
    var response = UrlFetchApp.fetch(url, options);
    var data = JSON.parse(response);
    // loop through the map and output to sheet
    for (i = 0; i < data.length; i++) {  
         
       page.push([data[i].number,
                  data[i].date_created,
                  data[i].status,
                  data[i].currency,
                  data[i].shipping_total,
                  data[i].total,
                  data[i].customer_id,
                  data[i].billing.first_name,
                  data[i].billing.last_name,
                  data[i].billing.email,
                  '1',
                  data[i].line_items[0].id,
                  data[i].line_items[0].name,
                  data[i].line_items[0].quantity,
                  data[i].line_items[0].total
                 ]);
      // now do any additional line items push a line with blanks if required
      for (j = 1; j < data[i].line_items.length; j++ ) {
        page.push([' ',
                  ' ',
                  ' ',
                  ' ',
                  ' ',
                  ' ',
                  ' ',
                  ' ',
                  ' ',
                  ' ',
                   j+1,
                  data[i].line_items[j].id,
                  data[i].line_items[j].name,
                  data[i].line_items[j].quantity,
                  data[i].line_items[j].total
                 ]);
        
      }

    }
  } catch(error) {
    var result = ui.alert( error.toString());
    return 0;
  }
  return page;
}

The other function, not covered yet is setupSheet all it is doing is clearing the sheet and adding titles.

function setupSheet() {
  // just clear sheet and set &amp; style headings
 var ss = SpreadsheetApp.getActiveSpreadsheet();
  // set the tab to post - just for neatness
 var sheetname = ss.getSheets()[0].setName('Orders');
  // clear the sheet
 var range = ss.getDataRange();
 range.clear();
 //set headings
  ss.getRange('A1').setValue('Order Number');
  ss.getRange('B1').setValue('Date Created');
  ss.getRange('C1').setValue('Status');
  ss.getRange('D1').setValue('Currency');
  ss.getRange('E1').setValue('Shipping');
  ss.getRange('F1').setValue('Grand Total');
  ss.getRange('G1').setValue('Customer ID');
  ss.getRange('H1').setValue('Billing First Name');
  ss.getRange('I1').setValue('Billing Last Name');
  ss.getRange('J1').setValue('Billing email');
  ss.getRange('K1').setValue('Order Line');
  ss.getRange('L1').setValue('Item ID');
  ss.getRange('M1').setValue('Item Name');
  ss.getRange('N1').setValue('Item Qty');
  ss.getRange('O1').setValue('Item Totatl');
  
  ss.getRange('A1:O1').setFontWeight('bold');
  ss.getRange('A1:O1').setFontStyle('italic');

}

And that is it.

This is the full script in one go

function onInstall(e) {
  onOpen(e);
}

function onOpen(e) {
  // setup a custom menu
  SpreadsheetApp.getUi().createAddonMenu() 
      .addItem('Get Orders', 'getOrders')
      .addItem('Set Domain Name credentials', 'getDomain')
      .addToUi();
  setupSheet();
}
function getDomain() {
  var html = HtmlService.createHtmlOutputFromFile('credentials')
      .setWidth(200)
      .setHeight(200);
  SpreadsheetApp.getUi().showModalDialog(html, 'Connect to WordPress');
}
function processCredentials(myForm) {
  PropertiesService.getDocumentProperties().setProperty('domain', myForm.domain);
  PropertiesService.getDocumentProperties().setProperty('consumer_key', myForm.key);
  PropertiesService.getDocumentProperties().setProperty('consumer_secret', myForm.secret);
  SpreadsheetApp.getUi().alert('Saved, hit OK and the script will try to get the order, this may take a while');
  getOrders();
}
function getOrders(){
  if ( PropertiesService.getDocumentProperties().getProperty('domain') == null ) {
    getDomain();
    return;
  }
  setupSheet();
  // loop here as we need get back posts in chunks, Rest API max is 100 post
  var offset = 0;
  var per_page = 50;
  var page = [];
  var values = [];
  
 do {
    page=getPage(offset,per_page);
    offset+=page.length;
    for (i = 0; i < page.length; i++) {
       values.push(page[i]);
    }
  } while ( page.length > 0 );
  
  
  //output range
  var ss = SpreadsheetApp.getActiveSpreadsheet();
  var sheet = ss.getSheets()[0];
  var range = sheet.getRange(2, 1, values.length, 15);
  range.setValues(values);
}

function getPage(offset,per_page) {
  
  // gets posts in chunks of per_page
  var ui = SpreadsheetApp.getUi();  // used for error messages
  var ss = SpreadsheetApp.getActiveSpreadsheet();
  var page = [];
  
  // set up authorisation
  var headers = {
    "Authorization" : "Basic " + Utilities.base64Encode(PropertiesService.getDocumentProperties().getProperty('consumer_key')+':'+PropertiesService.getDocumentProperties().getProperty('consumer_secret'))
    };
  
  var options = {
      'method': 'get',
      'headers': headers,
      "contentType" : "application/json",
      'muteHttpExceptions': false
    }
  
  var apiHost = PropertiesService.getDocumentProperties().getProperty('domain')+'/wp-json'; 
  // altenative to basic auth in case that doesn't work nicely e.g. you have JWT token plugin too.
  // url = apiHost + '/wc/v2/orders?per_page='+per_page+'&amp;offset='+offset+ '&amp;consumer_key='+PropertiesService.getDocumentProperties().getProperty('consumer_key')+'&amp;consumer_secret='+PropertiesService.getDocumentProperties().getProperty('consumer_secret');
  //
  url = apiHost + '/wc/v2/orders?per_page='+per_page+'&amp;offset='+offset;
  try {
    var response = UrlFetchApp.fetch(url, options);
    var data = JSON.parse(response);
    // loop through the map and output to sheet
    for (i = 0; i < data.length; i++) {  
         
       page.push([data[i].number,
                  data[i].date_created,
                  data[i].status,
                  data[i].currency,
                  data[i].shipping_total,
                  data[i].total,
                  data[i].customer_id,
                  data[i].billing.first_name,
                  data[i].billing.last_name,
                  data[i].billing.email,
                  '1',
                  data[i].line_items[0].id,
                  data[i].line_items[0].name,
                  data[i].line_items[0].quantity,
                  data[i].line_items[0].total
                 ]);
      // now do any additional line items push a line with blanks if required
      for (j = 1; j < data[i].line_items.length; j++ ) {
        page.push([' ',
                  ' ',
                  ' ',
                  ' ',
                  ' ',
                  ' ',
                  ' ',
                  ' ',
                  ' ',
                  ' ',
                   j+1,
                  data[i].line_items[j].id,
                  data[i].line_items[j].name,
                  data[i].line_items[j].quantity,
                  data[i].line_items[j].total
                 ]);
        
      }

    }
  } catch(error) {
    var result = ui.alert( error.toString());
    return 0;
  }
  return page;
}


function setupSheet() {
  // just clear sheet and set &amp; style headings
 var ss = SpreadsheetApp.getActiveSpreadsheet();
  // set the tab to post - just for neatness
 var sheetname = ss.getSheets()[0].setName('Orders');
  // clear the sheet
 var range = ss.getDataRange();
 range.clear();
 //set headings
  ss.getRange('A1').setValue('Order Number');
  ss.getRange('B1').setValue('Date Created');
  ss.getRange('C1').setValue('Status');
  ss.getRange('D1').setValue('Currency');
  ss.getRange('E1').setValue('Shipping');
  ss.getRange('F1').setValue('Grand Total');
  ss.getRange('G1').setValue('Customer ID');
  ss.getRange('H1').setValue('Billing First Name');
  ss.getRange('I1').setValue('Billing Last Name');
  ss.getRange('J1').setValue('Billing email');
  ss.getRange('K1').setValue('Order Line');
  ss.getRange('L1').setValue('Item ID');
  ss.getRange('M1').setValue('Item Name');
  ss.getRange('N1').setValue('Item Qty');
  ss.getRange('O1').setValue('Item Totatl');
  
  ss.getRange('A1:O1').setFontWeight('bold');
  ss.getRange('A1:O1').setFontStyle('italic');

}

[Next] Find out where to host WordPress [Read the full article…]

Filed Under: Code snippets, Google Apps for Works, Uncategorised, Useful Stuff, Wordpress  

Comments

  1. Hasan says

    15th July 2019 at 2:50 am

    Hi.. thank you for this. it helped me a lot. however, I’m making a multivendor site. I need to add a column for vendors with the order details.
    this is the documentation

    Reply
    • Alan says

      15th July 2019 at 12:36 pm

      I’m glad this article has help you a lot. I hope you get your column added OK.

      Reply
  2. gsm902342 says

    11th August 2019 at 8:58 am

    Exception: Request failed for …pangrice. returned code 401. Truncated server response: {“code”:”woocommerce_rest_cannot_view”,”message”:”\u62b1\u6b49, \u60a8\u7121\u6b0a\u67e5\u770b\u8cc7\u6599.”,”data”:{“status”:401}} (use muteHttpExceptions option to examine full response)

    401 error I cannt fix it

    Reply
    • Alan says

      11th August 2019 at 9:41 am

      401 is unauthorized, so Woo Commerce is telling you your API key is wrong.

      First try creating a new WooCommerce API key.

      Reply
  3. Eric says

    22nd October 2019 at 9:40 am

    Is this script still working?
    I did a try but no orders are loading at all.

    The credentials are working (I think) because I got the popup with Authentication, and when I hit “get orders”, the column headers are added to the sheet, but no orders are appearing but also no error at all.
    In the top, there is a green “block” that keeps saying “script is being executed….. CANCEL ” and a close button.
    But it stay there for infinite time.

    Is there somewhere I can check/troubleshoot why it’s not loading order details?

    Thanks!

    Reply
    • Alan says

      22nd October 2019 at 10:05 am

      Thank you for taking a look.

      I have just re-loaded that script – exactly as written on the blog post – and indeed there is a problem, for me it did finish, but after repeating the same order multiple times, so there seems to be an issue of the loop not advancing correctly.

      I will debug it at a future point, but if you spot the issue first let me know. I’ll add a header to the post warning people – so they don’t spend time …

      Reply
      • Eric says

        22nd October 2019 at 10:08 am

        Hello Alan,

        If you can let me know how I can find some kind of (error) log what is happening in background, I can troubleshoot and help you find a fix, but I don’t know where or how. This is my first time I’m getting into Google Scripting, I’m not that familiar with the interface yet.
        But if I can see some log output, I can track down the cause.

        Reply
      • Eric says

        22nd October 2019 at 10:17 am

        Alan, do you happen to know how much time this script need to fetch ~50 orders?
        Because in your article you somewhere mention “this may take a while”. Are we talking seconds, minutes, …?

        I’m trying with a new fresh demo setup and 55 something dummy orders.
        With Postman API, I get results back instantly, your script returns nothing at all.
        While you say it just finish fine at your end, it seems to be doing nothing at all on my end except showing a green pad “script is running” like forever.
        It would be convenient if it somewhere can just output some console log or something so I can check what it’s doing.

        Reply
        • Eric says

          25th October 2019 at 12:30 pm

          Alan, did you find a solution yet? I’m eager to try it out but it doesn’t render any records at all for me. I managed to get some kind of log, and in the log I can see data from the WooCommerce instance, but nothing is rendered in the rows…

          Thanks

          Reply
  4. Dylan Keys says

    4th December 2019 at 7:10 pm

    How can I change this so it pulls all woocommerce product details instead of orders?

    Reply
    • Alan says

      4th December 2019 at 8:14 pm

      You can modify the call instead of orders to retrieve products

      If you look in function getPage you will see the api call ( currently url = apiHost + ‘/wc/v2/orders?per_page=’+per_page+’&offset=’+offset; )

      One thing to consider is whilst you can list products – if you want additional info like product attributes, product categories, product shiiping classes, you may need to build in additional loops with additional API calls.

      The API docs are here https://woocommerce.github.io/woocommerce-rest-api-docs/#list-all-products

      Reply
  5. Asger says

    13th August 2020 at 9:35 am

    Hi,

    I am trying this but am getting authentification errors. I have sucessfully done your get post trial as well. Very nice!

    It is a 401 error and it says that i need to specify app name as a parameter. Is that something new that woocommerce has added?
    I am reading the API and it seems they ask for parameters such as app name.
    https://woocommerce.github.io/woocommerce-rest-api-docs/#rest-api-keys

    And just to be sure, the URL to specify is https//domainname.com/wc-auth/v1/authorize, correct?

    Reply
    • Alan says

      13th August 2020 at 11:56 am

      Hi,

      My example doesn’t use an authorization end point ( https//domainname.com/wc-auth/v1/authorize) ( and it also is using v2 or the api ) so I’m not sure what you are attempting to do.

      The example I use uses ‘basic auth’ over https in the headers as per the API docs ref: https://woocommerce.github.io/woocommerce-rest-api-docs/wp-api-v1.html#authentication-over-https

      Reply
      • Asger says

        13th August 2020 at 11:46 pm

        Thanks for the quick reply!

        Ok, i have corrected the domain end point yet this is the error i get:

        Exception: Request failed for https://domainname.com returned code 401. Truncated server response: {“code”:”woocommerce_rest_cannot_view”,”message”:”Sorry, you cannot list resources.”,”data”:{“status”:401}} (use muteHttpExceptions option to examine full response)

        I have tried using a good handful of different API keys and secrets now and I am pretty sure they were copy pasted correctly.

        Could this be a problem with my Host?

        Reply
        • Asger says

          14th August 2020 at 12:27 am

          Just following up here, I don’t think its my host.

          I have pasted the following into the browser and i dont get an error (though no content):

          https://www.domainname.com/wp-json/wc/v2/products/attributes?consumer_key=ck_1234567890&consumer_secret=cs_1234567890

          My API key appears as having been used as well in the woocommerce REST API settings, so I think its not a problem with my host.

          What could be going on?

          Reply
          • Alan says

            14th August 2020 at 7:57 am

            Why are you getting no output? Do you have no product attributes? Have you used browser tools to inspect the return code -are you still getting 401 unauthorised.

            You need to check you can get data – use curl as per the api docs first https://woocommerce.github.io/woocommerce-rest-api-docs/wp-api-v2.html#list-all-product-attributes

        • Alan says

          14th August 2020 at 8:02 am

          The server is talking to you & woo commerce is talking to you – 401 = not authorised – “Sorry, you cannot list resources.” so itlooks like Woo is saying you don’t have the right permissions. Has the user you created the API key got a high enough permission?

          Reply
          • Asger says

            16th August 2020 at 3:59 am

            Okay,

            i had to edit my htaccess file and add a line about http authentification:

            # BEGIN WordPress
            # The directives (lines) between `BEGIN WordPress` and `END WordPress` are
            # dynamically generated, and should only be modified via WordPress filters.
            # Any changes to the directives between these markers will be overwritten.

            RewriteEngine On

            RewriteRule .* – [E=HTTP_AUTHORIZATION:%{HTTP:Authorization}]

            RewriteBase /
            RewriteRule ^index\.php$ – [L]
            RewriteCond %{REQUEST_FILENAME} !-f
            RewriteCond %{REQUEST_FILENAME} !-d
            RewriteRule . /index.php [L]

            # END WordPress

            After that, it goes into the infinite loop and eventually it loaded data from the database several times, so i would recommend this for concept only as mentioned.

            Actually for this i ended up using a webhook to get my order data into sheets. Might use an API in the future for obtaining and editing product lists, but this script still has the infinite loop problem and the authentification bit.

            Thanks Alan!

Leave a Reply Cancel reply

Your email address will not be published. Required fields are marked *

Categories

  • Applications
  • Cloud
    • General
    • Google Cloud
    • IaaS
    • Other Internet Hosted Applications
      • Wordpress
        • WooThemes Canvas
        • WooThemes Canvas CSS
    • SaaS
  • Code snippets
  • Discounts
  • Genesis
  • Google Apps for Works
  • Linux
  • News
  • SEO
  • Server setup
  • Services
  • Tech Tips
  • Uncategorised
  • Useful Images
  • Useful Stuff
  • WordPress Hosting
  • WordPress Plugins

Tags

background jobs beadcrumbs bind brandings Cache canvas Centos chrome css fail2ban Find firefox Flash fraud genesis gocardless godaddy Google google maps hackers internet explorer javascript KashFlow Linus linux Magento mapquest maps microsoft mysql news nohup php plugin plugins queens diamond jubilee replace SED SEO skype Varnish Virtualmin Webmin woothemes Wordpress


Affiliate and Privacy Notices

This site is free to use, but hopes to cover some costs through affiliate income, some products and links are affiliates and may earn the site advertising income.

Some affiliates use Cookies to track if you purchase from them, this allows them to apportion revenue to us you will need to refer to their specific privacy notices as to how you are tracked.

This site is a participant in the Amazon EU Associates Programme, an affiliate advertising programme designed to provide a means for sites to earn advertising fees by advertising and linking to Amazon.co.uk.

  • Privacy Policy

Copyright © 2021 · Badly Wired